Test Ankle Mobility at Home With the 5-Inch Wall Test
You plant your foot, drive the knee forward, and somewhere around an inch or two of travel the heel starts to peel off the ground.
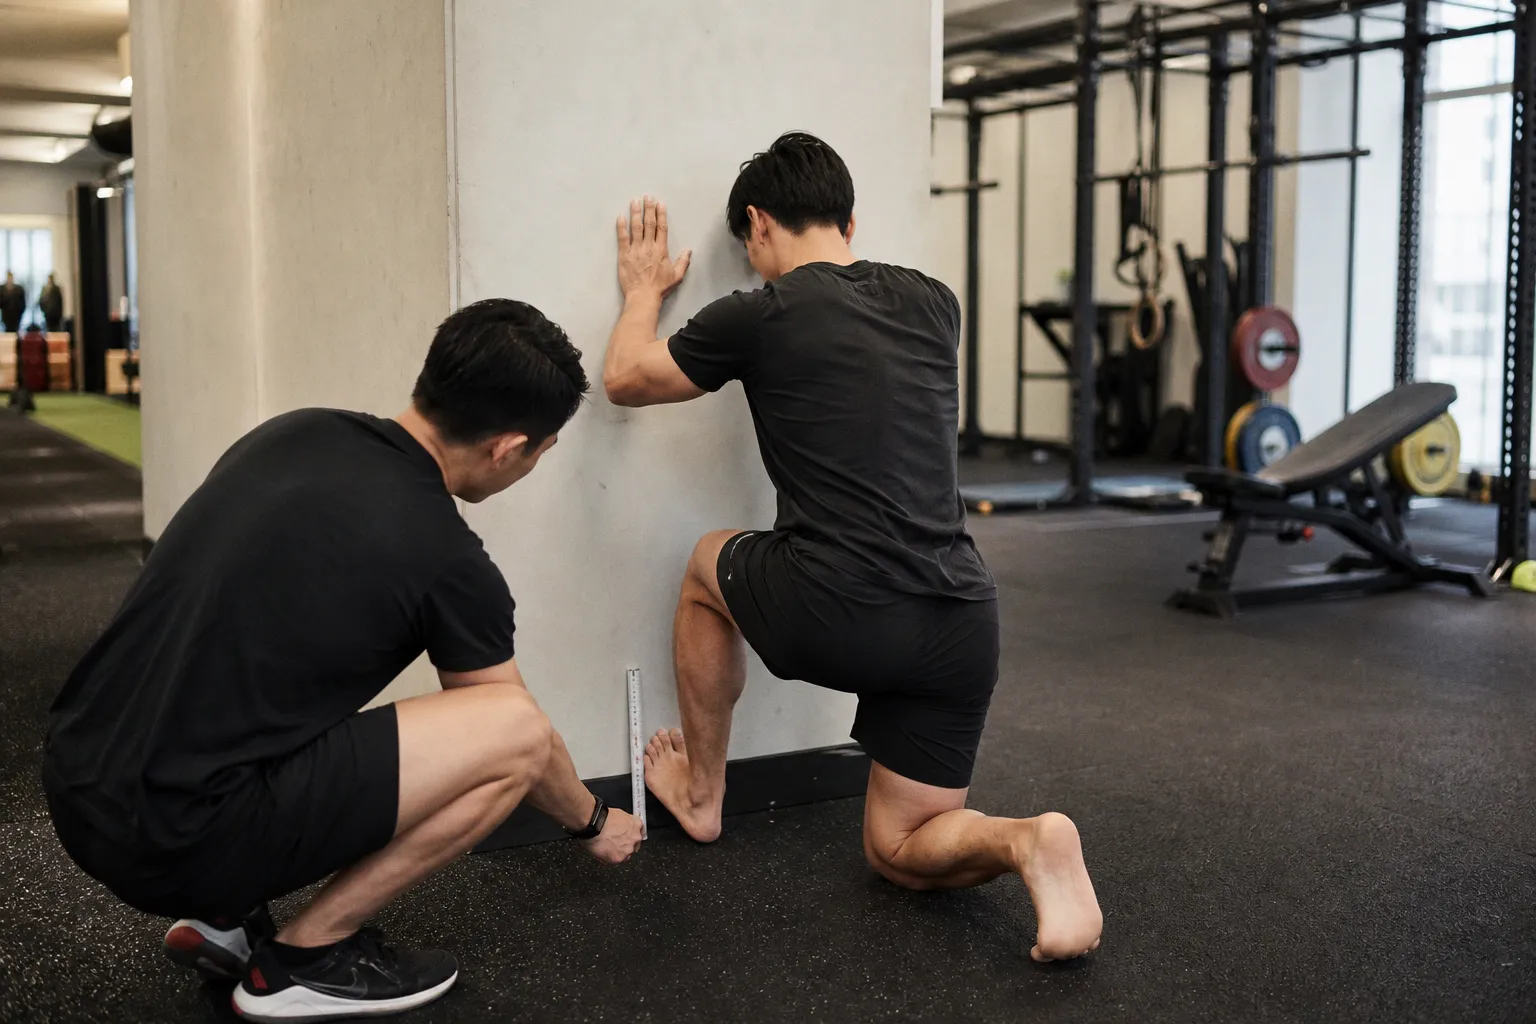
The Mechanics of the 5-Inch Wall Test: A Standardized Screening Tool
Before we walk through the protocol, it helps to know what we're actually measuring. Dorsiflexion is the closing motion at the ankle — the shin moving toward the foot while the foot stays in contact with the ground. Inside the joint, the talus (the small bone sitting just above your heel) rolls backward and glides forward inside the ankle mortise, the socket formed by the tibia and fibula. That coordinated roll-and-glide is what allows the knee to travel forward over the toes during a squat, a lunge, or the loading phase of a sprint.
What we call the 5-inch wall test is really a stripped-down version of the Weight Bearing Lunge Test (WBLT), a clinical assessment practitioners use to measure ankle dorsiflexion in a functional, loaded position. The five-inch benchmark matters because it corresponds roughly to the minimum amount of dorsiflexion most people need to perform a bodyweight squat to a comfortable depth without compensatory heel lift or excessive forward trunk lean. If you can reach the wall at five inches without your heel coming up, the joint is doing its job. If you can't, something is worth looking at.
It's worth saying out loud, because we say it to every athlete who walks into the clinic: this is a screen, not a diagnosis. The 5-inch wall test is a movement literacy check — it tells you whether your ankle is willing to do its job under load, and where to look next if it isn't.
The 5-inch wall test is a movement literacy check, not a medical verdict. It tells you whether your ankle is willing to do its job under load, and where to look next if it isn't.
Step-by-Step Execution: Measuring Your Dorsiflexion Range
Set yourself up facing a wall, barefoot or in flat, thin-soled shoes. Thick cushioned trainers will artificially inflate your toe-to-wall distance because the heel sits higher, so for a meaningful screen, go minimal underfoot. The exact impact of footwear on test results isn't fully standardized across protocols, but the general consensus is that the thicker the sole, the less honest the number.
1. Place your big toe exactly five inches (about 12.5–12.7 cm) from the wall. Use a ruler, a tape measure, or any object whose length you know — a sheet of paper folded a couple of times gets you close enough if precision isn't critical.
2. Keep your heel firmly planted. This is non-negotiable. The whole point of the screen is that the heel stays in contact with the floor while the knee travels forward; if the heel lifts, the test has lost its meaning.
3. Slowly drive the front knee toward the wall. Aim to make soft contact — knee to wall — without bouncing, lunging, or shifting your weight forward.
4. Stop at the first point you feel restriction. That sensation of "this is as far as it goes" — the soft wall we mentioned earlier — is your honest answer. Listen to the joint at end-range rather than forcing through it.
5. Repeat on the other side. Most of us are asymmetric, and the difference between left and right can be revealing in itself, especially if you notice one side feels dramatically more limited.
A few practical notes from the clinic floor. Do the test when you're warm — a few minutes of walking or some light movement is plenty — so cold tissue doesn't artificially restrict you. Do each side three times and take the best of three rather than the average; we're looking at your best capacity, not your worst effort. And don't try to "cheat" by twisting the foot outward or letting the arch collapse; both can give you a false pass.
Interpreting Your Results: Distinguishing Between Joint and Muscle Restrictions
If your knee touches the wall at five inches with the heel down on both sides, your ankle dorsiflexion is probably within a functional range for most general training — somewhere in the ballpark of 35 to 40 degrees, which is what's typically cited as the normal envelope for unloaded dorsiflexion in healthy adults. You'll still benefit from working on the ankles, because ankles love attention, but you're not in deficit territory.
If the knee doesn't reach the wall, the next question is what stopped it. This is the part most people skip, and it's also the part that determines whether your next month of mobility work actually pays off.
A soft, springy end-feel — like pressing into a taut rubber band — usually points to muscular restriction. The two muscles most often involved are the gastrocnemius (the bigger, more superficial calf muscle) and the soleus (the deeper one beneath it). The gastrocnemius crosses both the knee and the ankle, so it's most challenged when the knee is straight; the soleus only crosses the ankle, so it gets a more honest test when the knee is bent. If you retest with the back knee slightly bent and your reach improves noticeably, that's a strong clue the gastrocnemius is the main culprit.
A harder, abrupt end-feel — like the knee has run into a block of wood rather than a rubber band — is a different conversation. That can indicate restriction in the joint capsule itself, scar tissue from an old sprain, or in some cases anterior ankle impingement, where a bone spur or pinched soft tissue gets compressed at the front of the joint as the shin moves forward. None of this is panic-worthy, but it's a sign that generic calf stretching probably won't be enough on its own, and a clinician's hands-on assessment is the right next step.
| What you feel at end-range | Most likely contributor | What tends to help |
|---|---|---|
| Soft, springy, "rubber band" resistance | Calf muscle (gastrocnemius and/or soleus) | Targeted eccentric loading, sustained stretch, soft tissue work |
| Hard, abrupt, "bony" stop | Joint capsule, scar tissue, or anterior impingement | Manual therapy, joint mobilization, professional assessment |
| Clear improvement with bent back knee | Gastrocnemius dominant | Long-duration calf stretches with knee extended |
| Little change with bent back knee | Soleus or deeper structures | Bent-knee calf work, soleus-specific drills |
Compensatory Patterns: How Ankle Mobility Impacts Squats and Running
Dorsiflexion rarely stays an ankle problem. The body is wonderfully opportunistic — if one joint won't give, another will, and usually the substitution is something we'd rather not have. The body protects tissue tolerance first and range of motion second, so a tight ankle doesn't usually stop you from training; it just changes where the load goes.
In a squat, limited dorsiflexion shows up as heel lift, which forces the work onto the forefoot and turns the movement into something closer to a calf raise than a squat. It also produces forward trunk lean, because the body needs to keep the center of mass over the foot to avoid falling backward; the further the knee can't travel, the further the chest has to compensate. Over time, that pattern loads the lower back and can quietly push knees into valgus — caving inward — particularly under heavier loads.
In running, the same restriction shows up differently. A runner with limited dorsiflexion tends to land with the foot further out in front of the body, because the ankle can't absorb the load early enough in the stance phase. That extra braking force cascades up the chain, contributing to shin splints, knee pain, and the kind of "my calves are always tight no matter how much I stretch them" frustration that sends people searching the internet at 11 p.m.
The good news is that these patterns tend to be reversible — but only if you address the ankle, not just the symptom. Stretching your calves won't fix a forward-leaning squat if the ankle joint itself is the bottleneck; the body will simply find the next place to compensate, and the knee, hip, or lower back will quietly pick up the tab.
Beyond the 5-Inch Mark: Tracking Progress with the Weight Bearing Lunge Test
The 5-inch wall test is a yes/no threshold: you made it, or you didn't. Useful, but limited. Once you start working on ankle mobility, you'll want to track actual progress, and that's where the full Weight Bearing Lunge Test earns its place.
The WBLT uses the same lunge position against the wall, but instead of a fixed distance, you measure the maximum toe-to-wall distance at which your knee can still touch the wall with the heel down. A ruler on the floor or an inclinometer on the shin both work; clinicians often use a phone-app inclinometer for convenience. The measurement is typically recorded in centimeters, and progress is tracked in centimeters gained — a much more sensitive signal than the binary pass/fail of the 5-inch screen.
A reasonable benchmark for "normal" unloaded dorsiflexion falls between 35 and 40 degrees, which generally corresponds to a toe-to-wall distance of around 12 to 14 cm in adults. Individual anatomy varies considerably, though, and what you actually need depends heavily on your sport. A powerlifter chasing a deep squat with a fairly upright torso needs more ankle range than a marathoner who never sinks below parallel. There is no single universal standard, so resist the urge to compare your number to someone else's. What matters is whether your ankle has enough range for your movements.
A few practical guidelines for tracking over the long term:
- Re-test every four to six weeks. Less often and you'll miss meaningful change; more often and the noise will drown out the signal.
- Test at the same time of day, ideally after the same brief warm-up. Morning dorsiflexion is meaningfully different from afternoon dorsiflexion in most people.
- Pair the test with whatever mobility work you're actually doing — eccentric calf raises, controlled articular rotations, bent-knee and straight-knee calf stretches, soft tissue work on the lower leg — so you can see what moves the needle and what doesn't.
- Keep a simple log. Numbers in a notebook beat numbers in your head, especially when you're six weeks in and wondering if anything is happening.
There's one last thing worth saying, and it has nothing to do with ankle angles. While you're in the middle of a mobility project, it's easy to let it take over your whole training identity — to start skipping sessions because the ankle feels off, or to abandon hard sessions in favor of yet another mobility flow. A rebuilding body needs the rest of life to keep moving too. The unglamorous work of eating well, sleeping enough, and maintaining a life outside training matters as much here as the drills themselves, and sometimes a broader perspective on rest, leisure, and how you spend your downtime is what keeps the whole project from collapsing into a single-minded grind.
Progress on ankle mobility is measured in centimeters, not weeks. Trust the slow accumulation.
Patience is the hardest part of this work. Ankle tissue responds, but on its own timeline — months, not days. What you can do today is give yourself an honest starting point: stand five inches from a wall, drive the knee forward, and listen to what the ankle has to say. From there, every centimeter you reclaim is a centimeter your squat, your stride, and the rest of your kinetic chain gets to use.